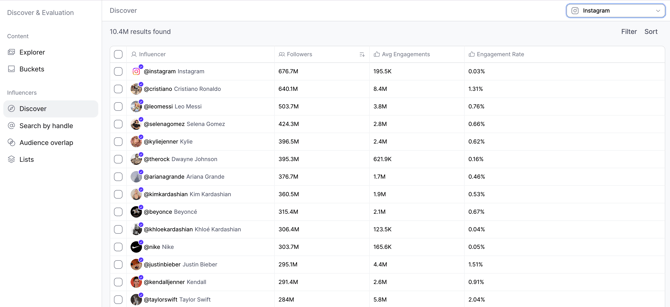
Every time you login and navigate to Discover, you'll be immersed in our expansive influencer database. Getting started is easy—just start by understanding your objectives.
Step 1: Choose a Social Network
In the upper right corner, you can select the social network that aligns with your goals. Currently, Discover offers access to:
- TikTok
- YouTube
Select the platform that best suits your needs, and start the discovery process.
Step 2: Initiate Your Search with Filters
Click the "Filter" button in the upper right corner, below the social network selection. This feature allows you to refine your search criteria, ensuring you find influencers who align with your campaign objectives.
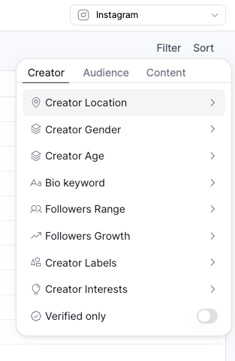
You can filter by creator, audience and content data. Use as many filters as needed to tailor your search precisely. After adding each filter, click "Add" and then "Apply All" to implement your selections.
Creator filters
- Location: Search influencers by country or city. For example, if you're launching a store in Madrid, search for influencers residing there.
- Gender: Choose male, female, or both. Gender-neutral accounts usually belong to companies / brands. If you prefer to exclude them, select male or female only.
- Age: Narrow your search with a specific age range if needed.
- Bio keyword: Matches specific words found in a creator's bio.
- Followers Range: Set minimum and maximum follower thresholds to match your needs (starting from 10K followers).
- Followers Growth: Specify the percentage of follower growth over up to six months to find rising influencers.
- Creator Labels: Create custom labels to categorize influencers (e.g., Fashion, Paid, Ambassador) and filter by them later.
- Creator Interests: Broad content themes inferred from what the creator posts about.
- Verified Only: Search exclusively for verified influencers for added authenticity.
Audience filters
- Location: Filter by audience location percentage to target specific geographic areas effectively.
- Gender: Specify the gender of followers to align with campaign demographics.
- Age: Filter influencers based on the age range of their followers to reach your target audience.
Content filters
- Average Engagements: Search based on average likes and comments to gauge audience interaction.
- Engagement Rate: Set a minimum engagement rate to ensure influencers effectively drive audience interactions.
- Avg Plays/Views: If your campaign focuses on video content, filter by average plays and views.
- Topics: Search for influencers who frequently publish content on specific topics relevant to your brand.
- Keywords: highly specific terms / words found in the creator's content.
- Hashtags: hashtags found in the creator's content.
- Mentions: mentions to other social media accounts found in the creator's content.
For a more qualitative approach (for niche / category-based research), use the Content Explorer. It allows you to assess the quality and relevance of influencer content, complementing the quantitative data in Discover and helping you make well-informed decisions.
Step 3: Explore and Export Your Search Results
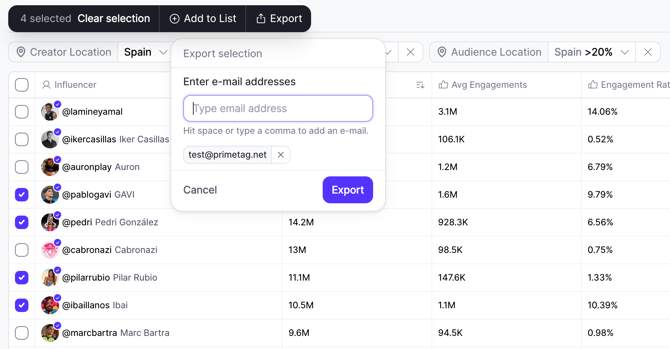
You'll see all applied filters throughout your search, allowing you to refine and modify as needed to find more profiles. The total number of results is displayed in the upper left corner, providing instant feedback on the scope of your search.
To export your results, select the checkbox next to each influencer's profile or click the top checkbox for a bulk selection. Then, enter your email address to proceed with the export!
If you need further details about this topic or have any additional questions, don't hesitate to reach out to our Support team at support@primetag.com. We're here to help!